Showing posts with label F5. Show all posts

Monday, August 12, 2013

Dials

And just when you thought this car was assigned to the back of the garage, a blog post appears!

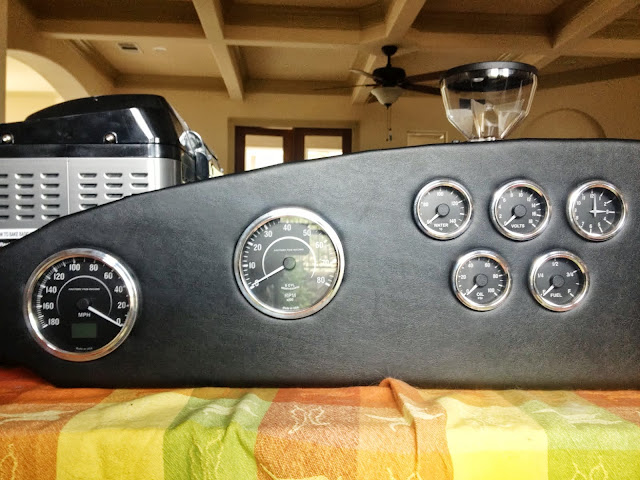
Alan has been busy assembling the dashboard. It is covered in the supplied faux-leather stuff which is stuck to an aluminium panel. This has pre-drilled holes in for the instruments, which are now fitted. Don't they look pretty?

The speedo is backwards, too. I believe original Cobras were like this.


Wednesday, January 23, 2013

Brakes

It's been a bit too chilly over the last few months to do much, and Alan had to work with stainless steel which is very hard to do at cold temperatures. And then there was Christmas etc which just took over, as it often does. However the weather has warmed up a bit and Alan was able to get on with the car this last weekend.

He had to flare the stainless steel tubing for the brake lines, to fit the connectors at each end of the system. They have special ends as it is a pressurised system. And then there was lots of pipe bending to get the hard line around the chassis to each brake.

Here are the two pipes leading from the master cylinders. The one on the left leads to the front brakes and the other one is the rear brakes.

This is the front left wheel. The 'S'-bend pipe is a flexible steel hose leading from the brake caliper back to the hard line, through the panel on the right. The silver block is a T-piece which allows the tubing to continue to the other wheel.

This is the same set-up, at the back right wheel this time. The pipe comes in from the other wheel at the top of this picture and through the small plate attached to the chassis. The other vertical pipe visible here is the fuel line, it is not connected. The large black block in the foreground here is the brake caliper again.

Alan tested the system with air pressure and figured that one of his flared ends was a bit leaky, so he cut that off and re-flared it. The new end worked a lot better, so he filled the system with brake fluid and bled the brakes. So far, there do not appear to be any significant (or even insignificant) leaks; it is holding pressure and the brakes do appear to work. I guess we can make better tests once we have some actual wheels on the car.

Monday, November 5, 2012

Fuel Lines

There has been a small hiatus in build proceedings, since Alan figured out that the engine is so big and thirsty, that he wasn't going to get enough fuel through the lines supplied with the kit. Whoops! So, he spent some time researching fuel lines and figuring out what he needed. Then he ordered the lines, and the necessary pipe bending tools etc.

He was able to make a bit of progress this weekend. In the picture below, you're looking straight down through the back end of the car. You can see the gas tank on the left, with some flexible hose leading to the hard stainless steel line that runs under the chassis, up to the engine bay. Alan had all sorts of fun and games bending the steel tube. He also had to flare the tube ends to fit into the shiny red and blue anodised connectors, which was also hard work. Stainless steel is tough stuff.

Alan has yet to finish attaching the line to the length of the chassis, and then he has the brake lines to do. We are hoping they might not be as tough since they're made of thinner tube. We will see.

Thursday, October 4, 2012

Engine!

We got a call today to say the engine had been delivered to the FedEx depot in Round Rock. This caused us to scramble; Alan rented a trailer from U-Haul and we took a ride up there.
Here's a panorama of the forklift driver after loading the crate onto the trailer.

We enlisted a couple of friends to help unload the trailer, since the crate weighed 570 pounds or thereabouts. There were other boxes of parts, including all the transmission etc, surrounding the engine.
L-R: Alan, with Charlie and Doug. Thanks guys!

And this is what was under the wrapping! It is a Keith Craft engine; a modified Ford 351 Windsor, bored and stroked to 408 and it will produce 525 horsepower. Wahoo!

Wednesday, September 26, 2012

Engine Hoist

Heavy engines full of horsepower need hoisting, so now we have a tool to do it. Yay micro crane!

Cockpit Panels

Alan has been busy installing the floor and wall panels to make the cockpit.

Looking over the dashboard towards the back of the car

View over the engine bay towards the back of the car; you can see the passenger footbox is complete here, but the driver's side is waiting for other bits before it gets enclosed.

View from the back towards the front

Wide side view... Look at all those angles! The transmission tunnel in the middle remains uncovered for now. The slots in the top panel closest to the camera are for harness straps.

Here's a chair, just for seeing how it will look.

And of course it has to be tried out! The seats are quite comfy and snug. Insert your own 'Vroom, vroom' noises here ;-)

Saturday, September 22, 2012

Steering rack and passenger side foot box

Alan has installed the steering mechanism. Looking at the front end of the car here, it is the silver bar that runs across in front of the 'X' of the frame.

Here's a close up of the passenger side. You can see the end of the steering arm attaches to the wheel assembly.

This is the driver side, showing the linkage made by universal joints and a worm drive, up to the steering wheel which will be mounted the other side of that silver panel. Alan tested it; it turns the wheels just dandy!

Next up should be the petrol/gas tank, but unfortunately we have been sent some wrong parts so that is on hold for a little bit. So Alan is getting on with the passenger side panels instead. Here is the front end of the passenger foot box.

And another look at it from the passenger's point of view, looking down into it. I hope to become very familiar with this view :-)

Monday, September 17, 2012

Panels, Rear Axle, Suspension and Pedals

This covers a couple of weeks' worth of work.

Here's the first panels installed back on the car. We have got the chassis lifted up on jack stands now, too. Makes for a better working height.


First bits of the front suspension installed.


Shock absorber and brake disc are in place.


Remember the rear axle? Alan had to take the cover off, to attach the rear brake mounting points on the ends of the axles. You can see all the gearing inside.


We manouvered and manhandled the axle underneath the back of the car to get it into place; this was a bit of a task since it weighs about 300 pounds! We shuffled it forward bit by bit, resting on axle stands, until it was close enough to attach all the suspension parts. At this point we were able to jack it up into position, and Lo! it stayed put :-)


Note to other builders: When the manual says to remove all the parts on the chassis before you start building, that includes this panhard frame, bolted on.... the axle has to go above this, OK?


Look, we have pedals! This is the clutch and the brake; the gas pedal comes in a little bit.


Unfortunately Wilwood (who make the pedals) have changed their design. While the new style is stronger, it also now fouls on the chassis. So Alan consulted the Interwebs, and found that folks either cut the chassis or doctor the pedals, to get enough travel. He figured it was less scary to cut the pedal, and easier to buy a new one if it got screwed up, so he took a Dremel to the side of it; you can see the silver cut mark on the lower part of this picture.


Here you can see the master cylinders for the brake pedals (front and rear brakes), and the clutch cable installed. Note to other builders again: See the panel here, in front of the pedals? This was contained in a box, it is not the one that was installed on the car for delivery! They are similar, but not the same. We think they may send ones for different models of car. Make sure you fit the right one...


Onwards!
Sunday, August 26, 2012

Rear Axle

Here's the rear axle. It's pretty substantial. Probably just as well; it will have lots of horsepowers to handle...

Preparation

The first thing one has to do is to remove the bodywork from the chassis. This means you need somewhere to store it. There are plans drawn in the manual to make a body buck; Alan hybridized this with one on the Factory Five forums to add additional shelving, and made this beast which we lifted the bodywork on to:

This leaves the chassis, with the aluminium panels in place underneath.

Another view from the other end. Next, the panels all need to be removed. They are all just screwed on, so you can just whip them off. There are more panels in boxes; this isn't all of them...

All off! Here's the chassis completely bare. Now the fun begins...

Feline approval

Our cat, Smokey, immediately claimed the chassis as a favourite place to sit underneath :-)

Delivery

Alan has always wanted to build a car. He decided to build a Factory Five Mk4 Roadster. Which is pretty awesome.

Here is the monster sized truck that turned up to deliver the car, from Stewart Transport. All the neighbours came out to see what the big truck was doing here ;-)

They have a very cool crane on the back of the truck to lower the cars off the truck. They used to tell people to have six guys waiting to manhandle the cars off until they got this. If memory serves, this is Mark guiding the car down off the hoist.

The cars are delivered with the bodywork on the frame. On to the trolley it goes, to be wheeled down to our garage. Angel is steadying the front end.

And here we are in the garage, after Mark hefted the car up to allow the trolley to be yanked out from underneath. The whole thing weighs about 450 pounds, so this was no mean feat. We didn't know we were meant to have jack stands ready to place the chassis on to. Sorry, Mark. Note to others: Get jack stands!

The mountain of boxes behind the car is just some of the myriad of cartons that accompanied the car. We have a lot of parts.

A closer view of the seating area in the car...